Features
AI Image Enhancer
By Ofrai Editorial (Use Case Research)
An AI image enhancer is judged on two separate things: whether it makes an image cleaner, and whether it makes it larger. Those are different operations with different failure modes. Upscaling reconstructs plausible detail at higher resolution, while restoration removes noise, compression artefacts, and softness without repainting your subject. On Ofrai you upload the original into Image Studio, run it through nano-banana-pro, gpt-image-2, flux-2, or seedream-5 with an edit instruction, and compare before-and-after at 100 percent zoom before you accept the result.
New accounts include 1 free GPT Image 2.5 generation. Other models and video use credits.
Example prompts
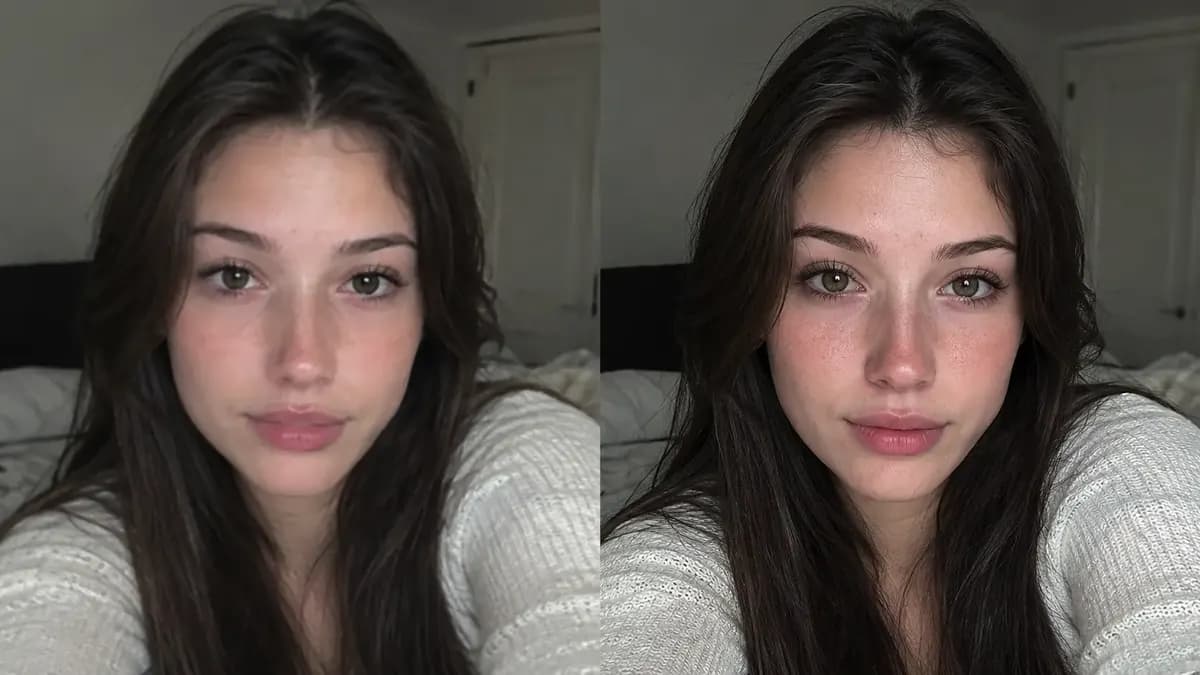
Detail close-up after clarity enhancement
Separating upscale from restoration in an AI image enhancer workflow
Do the restoration pass first and the upscale second. Restoring at low resolution throws away information the upscaler would otherwise have used to invent structure. A reasonable order is: denoise and de-block, correct exposure or colour, then upscale to your target dimension, then a final detail pass if needed. Upscaling first and enhancing afterwards means the model is sharpening artefacts it just magnified. Each pass costs credits, so running the correct sequence is also the cheaper sequence.
Setting a realistic target for an AI image enhancer
Asking for 4x from a 512 pixel crop produces an image that looks large but soft, because the model is filling most of those pixels with plausible texture rather than recovering real detail. Upscaling works well up to roughly 2x from a reasonably sharp source, and beyond that the gains are mostly imaginary. If you genuinely need 4000 pixels of width, regenerate the scene at high resolution instead of stretching a small crop. The honest ceiling is a function of the input, not the model.
Restoring old scans and compressed archives
For scanned photographs, describe the artefact you are removing rather than the look you want: "remove scanner dust and scratches, restore facial detail, keep the original warm tone and grain." Asking for a clean modern render will make the model repaint the face, change the era, and drop the grain that gives an old photo its character. Restore two to three times, not ten; repeated passes on the same image accumulate a waxy, plastic skin texture. Preserve the grain explicitly if the age of the image matters to you.
What upscaling genuinely cannot invent
No enhancer recovers information that was never captured. If the source is a 64 pixel avatar, an upscale cannot recover a real face, a readable logo, or a legible sign. Text is the clearest test: upscaled lettering invents plausible but wrong characters. Similarly, fine texture on fabric or fur beyond the sensor's limit comes back as repetitive or smeared pattern. Use enhancement for denoising, sharpening, and modest magnification. For text, small type, or true high-resolution work, regenerate at the correct size instead.
Choosing a model for editing rather than generating
gpt-image-2 is the most reliable editor on Ofrai: upload an image, describe the edit, and it holds the rest of the frame stable, which makes it the right choice for targeted work like removing an object or changing a background. nano-banana-pro follows a long, detailed edit instruction most faithfully. flux-2 is fast for quick denoise-and-sharpen passes. seedream-5 handles stylistic re-renders more than faithful restoration. Use reference-guided editing, not text regeneration, whenever the original matters.
Writing an edit instruction that does not over-reach
Edit prompts should name what changes and what must not. "Remove the sign from the wall, keep the wall texture, lighting, and perspective identical" tells the model where to stop. Leaving the stop condition out is why enhancement often quietly restyles a whole image. For a pure upscale with no generative pass, state "preserve all existing detail and structure, increase resolution only." If you want the tone shifted as well, do that in a separate pass so you can judge each change on its own.
A practical before-and-after check routine
Always compare at 100 percent zoom on a 1:1 pixel view, not scaled to fit. Look along three lines: edges (do stair-stepping and halos appear along high-contrast borders), texture (is noise reduced or has it become plastic smear), and faces (is skin detail plausible, or has it smoothed into a mask). Compare against the original side by side, not from memory. If halos appear around edges, reduce the sharpening strength and re-run. Most disappointing enhancement results come from judging on a downscaled preview.
Four repair prompts for an AI image enhancer you can paste
Deblur a soft phone photo: "sharpen the focus on the face, restore natural skin texture, keep the original framing, colour, and background unchanged, no added objects." Remove scanner dust: "remove dust specks and stray hairs on the scan, restore the fabric and skin beneath, keep the original grain and warm tone, do not smooth the surface flat." Fix an underexposed interior: "lift the shadows to a readable level, keep highlight detail intact, preserve the original white balance, no crushed contrast."
Recover a compressed web image: "remove blocking and colour noise, reconstruct the edges around text and faces, keep the original colour cast." Notice the shared pattern: each names one defect, one thing to restore, and three things that must not change. Instructions that omit the third group are the reason edits drift.
Sizing the job: source pixels against target pixels
Compute the multiplication before you render anything. A 600 by 800 original taken to 2400 by 3200 is a 4x job producing roughly eight megapixels, which is comfortable. The same file pushed to 8000 pixels wide is a 13x job, and past roughly 8x the extra pixels are invention rather than recovery. The rule of thumb is not to upscale beyond about twice the resolution at which detail is genuinely resolved in the source.
If the real target is a print at 300 PPI, work the pixel requirement back from the print size first — an A3 sheet at 300 PPI needs about 3508 × 4961 pixels before bleed — and then decide which stage is responsible for producing them.
The three settings that decide whether an edit holds up
Edit or denoise strength is the one that matters. Too low and noise survives; too high and the model substitutes plausible texture for real texture. Move it in small steps and check at 100 percent rather than zoomed out. Mask or region selection, where the tool offers it, is worth using for targeted work, because repairing a face inside an otherwise acceptable frame is a different job from restoring the entire frame, and a mask lets you state which one you mean.
What a restoration pass costs in credits
A restoration pass is cheap compared with the retries that usually follow one. Denoise or debasic: two to four renders. Colour and exposure correction: one or two. Upscale to a print-ready size: one to three. A fully restored old scan typically lands at four to six renders, and every one runs at the target resolution, so a twenty-megapixel output costs substantially more than a two-megapixel test — always settle your settings on a small first pass, then render once at full size.
On Ofrai all of this draws on a single credit balance. The genuinely expensive mistake is running six full-resolution attempts to settle a parameter that one low-resolution test would have answered.
Restoring faces and knowing when to stop
A face deserves its own pass and its own limits. A face that is merely soft can usually be recovered with a targeted instruction: "restore facial detail, keep the person's age, expression, and features exactly as they appear, natural pores, no beautifying." A face that is genuinely unresolvable — heavy motion blur, extreme compression, or a very small thumbnail — will be replaced by a plausible face belonging to nobody. Decide which case you are in before rendering, because a plausible wrong face is harder to catch than an obviously broken one.
For portraits that genuinely matter, restoring the frame and generating the person afresh is sometimes the honest route.
Who this page suits, and when generating fresh is better
This page is for material you already own or hold rights to: scans, phone photographs, old prints, compressed web assets, and images that must survive a print run or a marketplace listing at larger size. It is a weak fit when the source holds no real detail, because the honest output is no sharper than the input. It is also a weak fit for creating something that never existed — a specific product arrangement, a new background, an invented scene.
That is generation rather than enhancement, and a generative model with a fresh prompt will beat an upscaler with a faithful one every time. Use enhancement to repair what was captured and generation to invent what was not.
Examples
FAQ
- What resolution can AI upscaling realistically reach?
- Upscaling works reliably up to roughly twice the size of a reasonably sharp source. Beyond that the model is generating plausible texture rather than recovering real detail, so the file gets larger but not genuinely sharper. If you need very large output, regenerate the scene at high resolution instead.
- Can AI enhancement recover a blurry or low-resolution face?
- Only partially, and not reliably. Enhancement removes noise and compression artefacts and can sharpen what was soft, but a face that was never captured in enough pixels cannot be reconstructed faithfully. Treat an enhanced result as a plausible interpretation, not a restoration of the original.
- Why do upscaled images make text unreadable?
- Lettering at the limit of the source resolution contains almost no recoverable signal, so the model invises plausible characters instead of the real ones. Enhancement is not an OCR tool. For readable text, regenerate the graphic at a size where the type was actually resolved.
- Should I denoise before or after upscaling?
- Denoise first. Restoring at low resolution discards information that the upscaler could otherwise have used to build structure. A sound order is denoise and de-block, correct exposure or colour, then upscale, then a final detail pass if the target requires it.
- Why does my enhanced image look waxy or plastic after several passes?
- Each pass adds another layer of model-inferred texture on top of the previous one, and the cumulative effect is smooth, over-rendered skin with no grain left. Restore two or three times at most, and state explicitly in the prompt that the original grain and tone should be preserved.
- Can I remove an object from a photo without changing the rest?
- Yes, and reference-guided editing does it better than regeneration. Upload the image and write an edit that names both the change and the stop condition, for example remove the sign from the wall while keeping the wall texture, lighting, and perspective identical. gpt-image-2 holds the untouched frame most stable.
Related generators
- AI Animal Generator for Pet Photos and Wildlife
- AI Avatar Generator — Consistent Faces
- AI Logo Generator
- AI Photo Editor
- AI Portrait Generator
- AI Product Cutout Generator
- AI Thumbnail Generator
- AI Transparent Product Assets
- AI Action Figure Generator
- AI Black And White Photo Generator
- AI Caricature Generator
- AI Character Sheet Generator